Using plotly in your notebook for a jekyll blog post
First we'll start out like normal by importing necessary plotly modules as well as numpy and pandas. The init_notebook_mode line is very important for when we download this notebook as html, if you set it to True it won't work
from plotly.offline import download_plotlyjs, init_notebook_mode, plot, iplot
from plotly.graph_objs import Scatter, Figure, Layout
import plotly
import plotly.graph_objs as go
init_notebook_mode(connected=False)
import json
import numpy as np
import pandas as pd
We can make a basic plotly scatter plot
N = 1000
random_x = np.random.randn(N)
random_y = np.random.randn(N)

# Create a trace
trace = go.Scatter(
    x = random_x,
    y = random_y,
    mode = 'markers'
)

data = [trace]

layout = go.Layout(
    autosize=False,
    width=500,
    height=500,
    margin=go.Margin(
        l=20,
        r=50,
        b=100,
        t=100,
        pad=4
    )
)

fig = go.Figure(data=data, layout=layout)

# Plot and embed in ipython notebook!
iplot(fig,show_link=False)
or a basic histogram
x0 = np.random.randn(500)
x1 = np.random.randn(500)

trace0 = go.Histogram(
    x=x0
)
trace1 = go.Histogram(
    x=x1
)
data = [trace0, trace1]
layout = go.Layout(barmode='stack',autosize=False,
    width=500,
    height=500,
    margin=go.Margin(
        l=20,
        r=50,
        b=100,
        t=100,
        pad=4
    ))
fig = go.Figure(data=data, layout=layout)

iplot(fig, show_link=False)
Where thing get really interesting with plotly is you can create plots with pseudo inputs through plotly buttons and dropdowns to render more advanced visualization options even in a static html page
The example below shows a simple slider example
steps = []
for i in range(len(data)):
    step = dict(
        method = 'restyle',
        args = ['visible', [False] * len(data)],
    )
    step['args'][1][i] = True # Toggle i'th trace to "visible"
    steps.append(step)

sliders = [dict(
    active = 10,
    currentvalue = {"prefix": "Frequency: "},
    pad = {"t": 50},
    steps = steps
)]

layout =go.Layout(sliders=sliders,
    autosize=False,
    width=500,
    height=500,
    margin=go.Margin(
        l=20,
        r=50,
        b=100,
        t=100,
        pad=4
    ))

dict(sliders=sliders)

fig = dict(data=data, layout=layout)

iplot(fig, show_link=False)
You can also create a graph with a dropdown menu:
df = pd.read_csv('https://raw.githubusercontent.com/plotly/datasets/master/volcano.csv')

data = [go.Surface(z=df.values.tolist(), colorscale='Viridis')]

layout = go.Layout(
    width=600,
    height=500,
    autosize=False,
    margin=dict(t=0, b=0, l=25, r=0),
    scene=dict(
        xaxis=dict(
            gridcolor='rgb(255, 255, 255)',
            zerolinecolor='rgb(255, 255, 255)',
            showbackground=True,
            backgroundcolor='rgb(230, 230,230)'
        ),
        yaxis=dict(
            gridcolor='rgb(255, 255, 255)',
            zerolinecolor='rgb(255, 255, 255)',
            showbackground=True,
            backgroundcolor='rgb(230, 230, 230)'
        ),
        zaxis=dict(
            gridcolor='rgb(255, 255, 255)',
            zerolinecolor='rgb(255, 255, 255)',
            showbackground=True,
            backgroundcolor='rgb(230, 230,230)'
        ),
        aspectratio = dict(x=1, y=1, z=0.7),
        aspectmode = 'manual'
    )
)

updatemenus=list([
    dict(
        buttons=list([
            dict(
                args=['type', 'surface'],
                label='3D Surface',
                method='restyle'
            ),
            dict(
                args=['type', 'heatmap'],
                label='Heatmap',
                method='restyle'
            )
        ]),
        direction = 'down',
        pad = {'r': 0, 't': 0},
        showactive = True,
        x = 1.25,
        xanchor = 'left',
        y = 1.1,
        yanchor = 'top'
    ),
])

annotations = list([
    dict(text='', x=0, y=1.085, yref='paper', align='left', showarrow=False)
])
layout['updatemenus'] = updatemenus
layout['annotations'] = annotations

fig = dict(data=data, layout=layout)
iplot(fig, show_link=False)
For many more examples like this go to: https://plot.ly/python/
Downloading your notebook and converting it into a jekyll friendly html file
There are two ways of doing this.
1: Download as html file shown below in the jupyter notebook UI
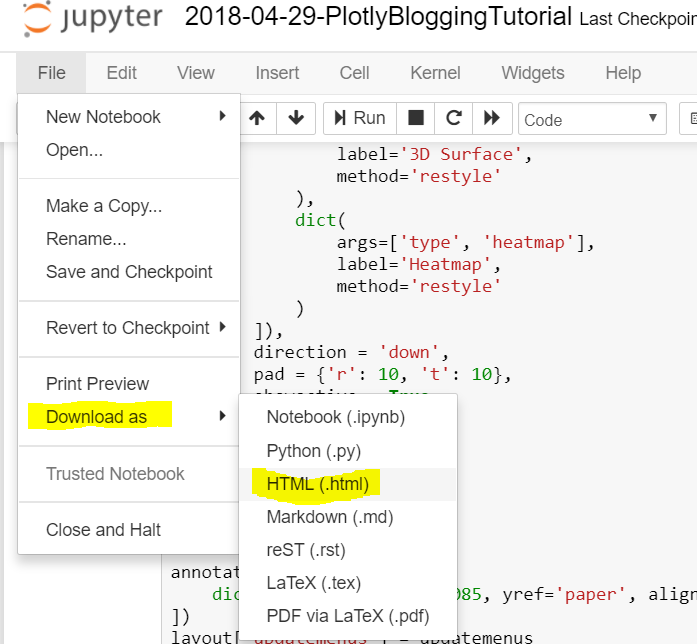
2: Use nb convert in terminal
- more documentation about nbconvert can be found on their github page
jupyter nbconvert --to html --template full path/to/YYYY-MM-DD-testpost7.ipynb
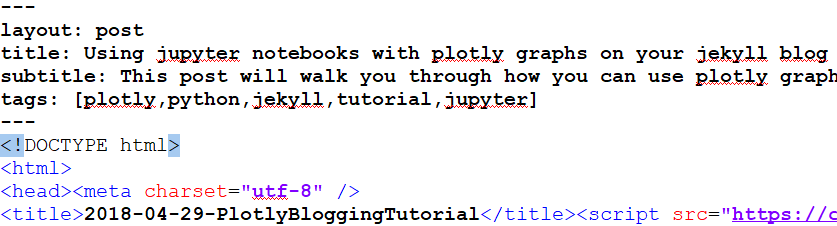
Editing your html file to render correctly
Now that you have your html file there's just a couple changes we need to make in the code or else we will get errors on our site when jekyll tries to render the post.
The main thing we'll need to do is add our Jekyll front matter.
Plotly Troubleshooting
For some reason if you have this code line in your notebook as you would normally for plotly:
init_notebook_mode(connected=True)
you will get a weird error in your site like this if you try to upload your html file:

so we just need to go find and replace that line which is causing problems:
with this line:
<script src="plotly.js" charset="utf-8"></script>
that loads in the plotly package correctly
For more info see: https://github.com/plotly/plotly.js/blob/master/dist/README.md
Or, just make sure you have connected mode set to false when you download your notebook as html:
init_notebook_mode(connected=False)
and you shouldn't run into the error
Adding Jekyll Front Matter
This should be fairly straightforward, you just need to add the normal .yml style jekyll front matter above <!.DOCTYPE html> so that your post will actually be recognized.
As an alternative you can put this front matter in a markdown cell at the top of your notebook. However, depending on your setup, this probably won't render the title correctly. In my case I would have to name the notebook the same, or else the index wouldn't show the correct title and subtitle, although on the post itself the information would be correct. You can also change the title tag in the html itself, but again I'd just stick with editing the front matter, since you'll need it for any custom stuff also, and we can make a very simple python script to make this process seamless in the future
Automated Jekyll Html post from jupyter notebook
Below I've created a simple function that will convert your given jupyter notebook into an html file and prepend the jeykll front matter of your post by taking in a multiline python string. You could easily extend this function to make it more robust by adding support for file searching with relative paths, allowing multiple files to be passed in, and even use it in your custom workflow to automatically send the outputted file to your _posts or _drafts folder on github
In fact, I ran these 2 cells below to generate the post you are reading now from the jupyter notebook I had running
front_matter_str = """---
layout: post
title: Using jupyter notebooks with plotly graphs in a jekyll blog
subtitle: This post will walk you through how you can render plotly graphs inside your jekyll blog using jupyter notebook
tags: [tutorial,plotly,python,jupyter,jekyll]
---"""
import subprocess

def conv_nb_jekyll(filename,front_matter):

    """
    this function will convert your jupyter notebook to html and
    prepend the front matter string you provide to the top of the resulting html file

    Args:
        filename: filename of input jupyter notebook (.ipynb file)
        front_matter: python formatted string resembling YAML jekyll front matter
    Returns:
        jekyll_html_post: location of final html file to post on your jekyll blog
    """

    #convert jupyter notebook to html
    subprocess.call(["jupyter", "nbconvert","--to","html","--template","full",filename])

    #function that will prepend given string to given filename
    def prepend_string(filename, string):
        with open(filename, 'r+') as f:
            content = f.read()
            f.seek(0, 0)
            f.write(string.rstrip('\r\n') + '\n' + content)

    #call function to prepend front matter to the file
    html_file = filename.replace('.ipynb','.html')
    prepend_string(html_file,front_matter)
    print('converted html file at: ',html_file)

    return html_file


jekyll_html_post = conv_nb_jekyll(filename='2018-04-29-PlotlyBloggingTutorial.ipynb',front_matter=front_matter_str)
Concluding Remarks
Once you have done that you should be good to go just upload your html file into your _posts folder and it should just work.
The only downside to using plotly in your blog posts that I've found is the graphs are not mobile friendly, and it's very difficult to get the plots to look good on both mobile and desktop.
Also, in general the html output is pretty ugly to mess with so if you want to style the code blocks or other formatting differently you should probably just output as markdown instead of html and style it that way which can get complicated. That's why I just stick with the default formatting, because I like to spend most of the time on actual content